Going for old school, eh?
Ok, first we're going to be working with Layer 1. Make sure
that layer is selected, and then click
Select --> All. Then hit ctrl
C to copy the layer to the clipboard.
Next, click Layer --> Add Layer Mask --> Hide All.
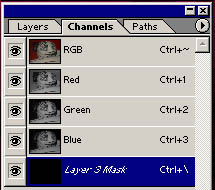
Now, click the Channels tab. Click layer 3 mask and click the eye icon to make it visible. The tab should now look like this.
Press Ctrl V, and then make Layer 3 mask invisible again..
Go back to the Layers tab.
It should now look like this, with Layer 1
having two images.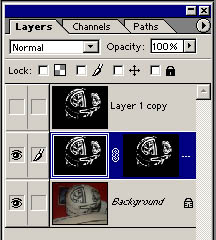
One is the original image, and the other is the mask. But you're probably
wondering why your image doesn't look any different. You'll see in a moment.
It's time to make the circuits appear the proper color. Select the paint
bucket tool, and then choose what color you want the circuits to be. For
the example, I chose red. Now, make sure the left image of Layer
1 is selected, and then fill it completely with your chosen color,
wiping out the white circuit trace.
Your image and layer tab should now look something like this.

Pretty cool, eh? Looks pretty close to the real thing. But what about that final layer? That layer is going to add the final touch of authenticity to the image. In the film, circuits had a slight dark outline, giving them an inset appearance. Let's make "Layer 1 copy" visible again and set its blending mode to Normal for a moment so we can see what we're doing.
Now, click Filters --> Stylize
--> Find Edges. You now have a nice outline of the circuits.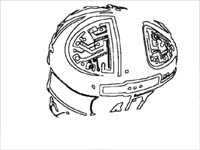 Set set the blending mode not to screen, but to multiply. This is the
opposite of screen, and lets the images behind it pass through white instead
of black. Right now the outline is a bit overpronounced, so click Filter
--> Blur --> Gaussian Blur. Set the blur to a point at which
the edges become fuzzy.. Next, go Image --> Adjust
--> Hue/Saturation. Check the "Colorize" box and drag
the hue slider to whatever you chose for your circuit color. Set Saturation
to 50. Pretty good, but still a little too pronounced. Finally, click
Image --> Adjust --> Levels. You'll
see a box with three markers (triangles) beneath it. Click the one farthest
to the right and drag it left until the circuit outline looks good, and
Voila!
Set set the blending mode not to screen, but to multiply. This is the
opposite of screen, and lets the images behind it pass through white instead
of black. Right now the outline is a bit overpronounced, so click Filter
--> Blur --> Gaussian Blur. Set the blur to a point at which
the edges become fuzzy.. Next, go Image --> Adjust
--> Hue/Saturation. Check the "Colorize" box and drag
the hue slider to whatever you chose for your circuit color. Set Saturation
to 50. Pretty good, but still a little too pronounced. Finally, click
Image --> Adjust --> Levels. You'll
see a box with three markers (triangles) beneath it. Click the one farthest
to the right and drag it left until the circuit outline looks good, and
Voila!
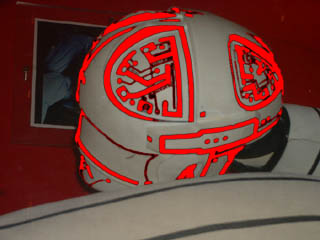
You now have a classic Tron circuit glow. If it didn't come out exactly the way you wanted, go back and try again. Learn the steps, tweak the settings a little. With practice, you'll get much better, and then you can impress your friends with your newfound yadda yadda yadda I'm supposed to say some kind of funky conclusion here but instead.. I'll just say END OF LINE.
After you feel like you've mastered this, if you haven't already, you might want to grab the newest subroutine and learn how to make glowing Tron 2.0 circuits.